How to transfer data from Mac to iPhone/iPad
AirMore
AirMore is a free web-based application that lets you manage phone files from your computer. This is fully compatible with iOS and Android and it works smoothly on Windows and macOS as well. It can help you import and export files from Mac to iPhone or vice versa, including videos, music, photos and other files. This app’s selling point is that you can wirelessly connect your iOS device to your Mac.
Step 1: On your iOS device, go to the App Store to download and install the AirMore app installed.
Step 2: Launch a web browser on your Mac, and visit the official webpage of AirMore.
Step 3: Connect your iOS device and Mac to the same WiFi network. Launch the AirMore app on your iPhone or iPad, and tap “Scan to connect” button to connect it to your Mac by scanning QR code.
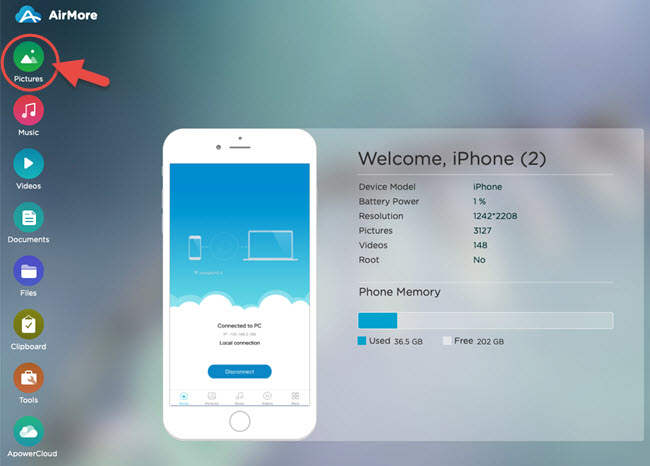
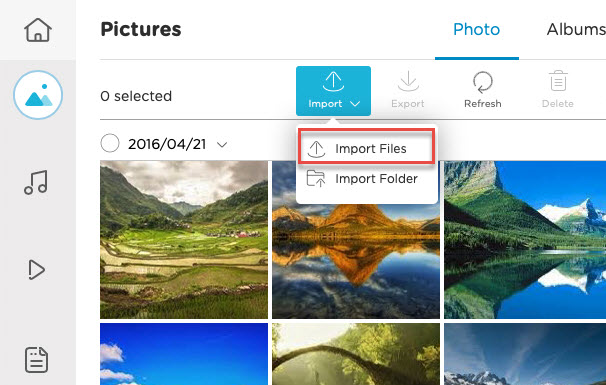
Step 4: To transfer files from Mac to iPhone or iPad, just enter a certain file folder, then click the “Import” button to import files to your iPhone or iPad. Take photos as an example. To transfer photos to iPhone or iPad from Mac, click on the “Pictures” icon, and then click “Import” to select photos that you want to transfer to your iOS device and start the transferring process.
ApowerManager
ApowerManager is a professional management tool that supports Android and iOS devices. This program has a user friendly interface and many settings, which allows you to easily manage your phone data. Aside from that, it also lets you transfer, organize, and backup your phone data without hassle. Therefore, you can easily transfer files from your Mac to your iOS device using this tool. To learn how to copy files from Mac to iPhone, just refer to the steps below.
Step 1: Download and install the program on your Mac, and get it on your iPhone from the App Store. Launch it afterwards.
Step 2: Connect your iPhone to your Mac using a USB cable.
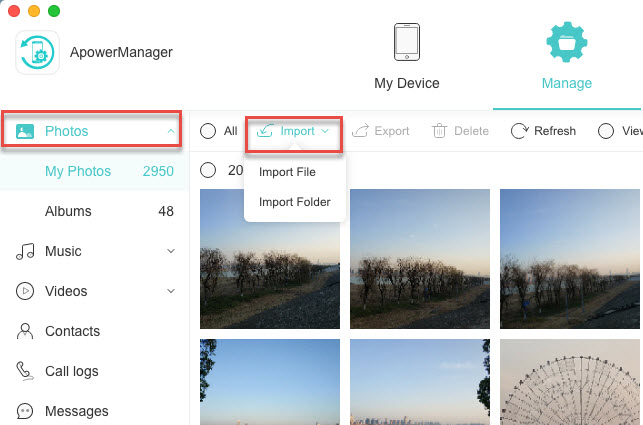
Step 3: Once connected, click the “Manage” button on its main interface, and then proceed to the file folder with the file type you want to transfer. Then click on the “Import” button and select files from your Mac and confirm to transfer them to your iPhone. Then your files will be successfully moved to your iPhone.
AirDroid
AirDroid is another tool that allows you to access and manage your mobile phone or tablet from Windows or Mac wirelessly. The good thing about AirDroid is that now with its latest release, aside from Android users, even iOS users can make use of this app to transfer files wirelessly. In order to transfer files from Mac to iPad or iPhone using AirDroid, simply follow the steps below.
Step 1: On your iPhone or iPad, download and install the AirDroid application from the App Store.
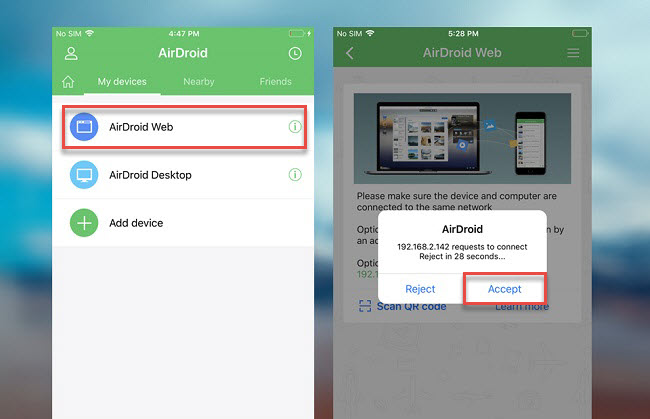
Step 2: Open the app on your iOS device, head to “My devices”, and tap on “AirDroid Web”, then you’ll be guided to the connection options.
Step 3: You can connect via an IP address. Just enter the IP address that appears on your Mac web browser, and then tap the “Accept” button if there is a prompt. Afterwards, your iPhone or iPad will be successfully connected to your Mac. Or you can visit the AirDroid website and scan the QR code to connect your iOS device to Mac.
Step 4: Once done connection, you will be able to transfer files from Mac to your iPhone or iPad and vice versa.
Conclusion
To sum up what we’ve covered above, transferring files from a Mac to an iPhone or iPad may be a little bit complex if you are not so familiar with macOS. However, the tools mentioned above are professional and practical, and can certainly that can help you transfer files with fewer worries. You can choose the one that meets your needs best. Let us know if you have any questions about this article or comments about what works for you.
Leave a Comment