
Many people want to share files between computers or between computer and phone in an easy way. Well, provided your devices are connected to the same network, you can create a shared folder on the computer so that other devices can access it without any hassle. Now follow the guide below to learn how to share a folder or a hard drive in Windows/Mac over the network.
Detailed Steps on How to Share Folder/Drive
Windows Users
The processes to share a folder or hard disk in Windows 10, Windows 8 and Windows 7 are exactly the same, aside from one extra feature Windows 10 owns while the others don’t, which is the ability to create or join a homegroup.
Share a folder
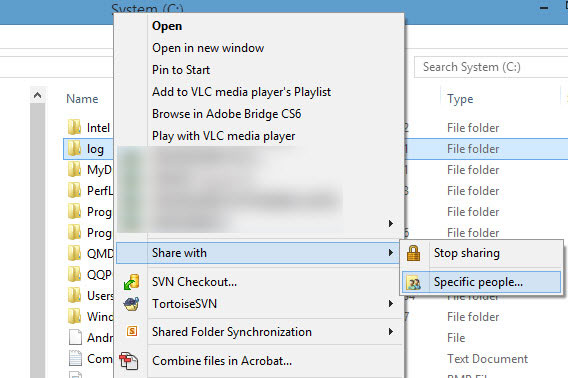
- Locate the folder that you would like to share, right-click it.
- In the drop-down window, choose “Share with” > “Specific people…”.
- Choose people or group to share with. Usually, you can just select your computer account. Apart from it, you can also select “Everyone”, in which case, all the devices connected to the same WiFi can have access to the folder without the need to enter the password. Although it’s convenient, it is not very secure.
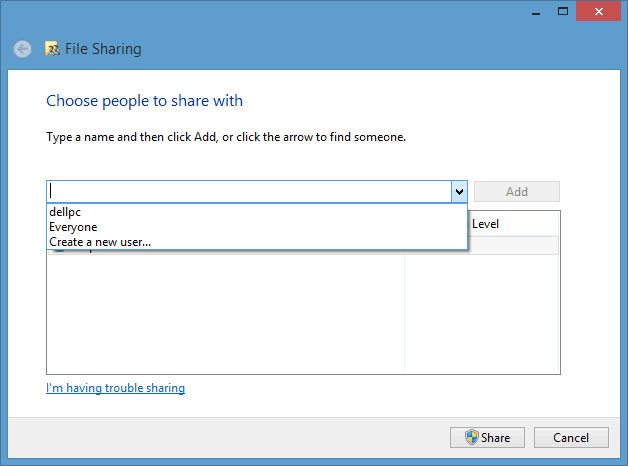
- At last, click “Share”. Then the folder is now being shared.
Share a drive
- Open “This PC”, right-click the hard drive you want to share.
- Choose “Share with” > “Advanced sharing…”.
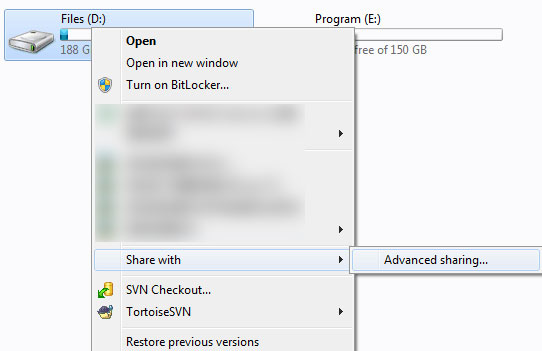
- After a window pops up, go to “Sharing” tab, click “Advanced sharing…”.
- In the newly-opened window, check “Share this folder”, and then you can change the number of simultaneous users (more than 10 is suggested). Lastly, click “OK”.

Note: If you want to make sure your shared folder or shared hard drive are safe, you can go to “Control Panel” > “Network and Internet” > “Network and Sharing Center” > “Change advanced sharing settings”.
If you are using Windows 10 or Windows 8, click “All Networks”, choose “Turn on password protected sharing”, and click “Save changes”.

If you are using Windows 7, you may find the option to “Turn on password protected sharing” under “Home or Work”.

Of course, you can turn off the password protection using the same way.
Mac Users
Since most people have updated their Mac to the latest operating systems, such as OS X EL Capitan or macOS Sierra, I will just show you how to share your files on the Mac OS 10.
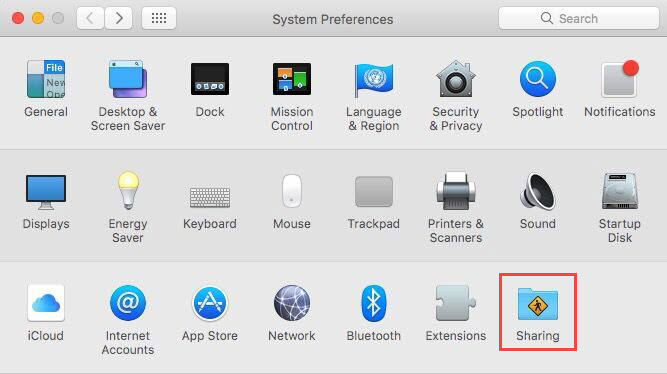
- Tap the Apple icon on the left upper corner, click “System Preferences…”.
- In the window, locate “Sharing” and open it.
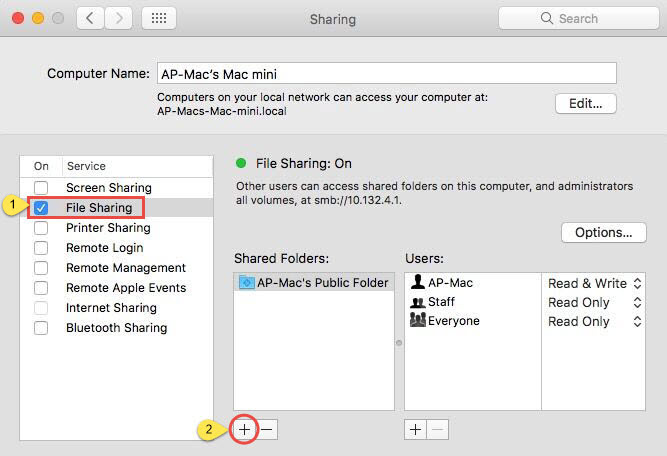
- After that, check “File Sharing” and click the “+” under the “Shared Folders” box.
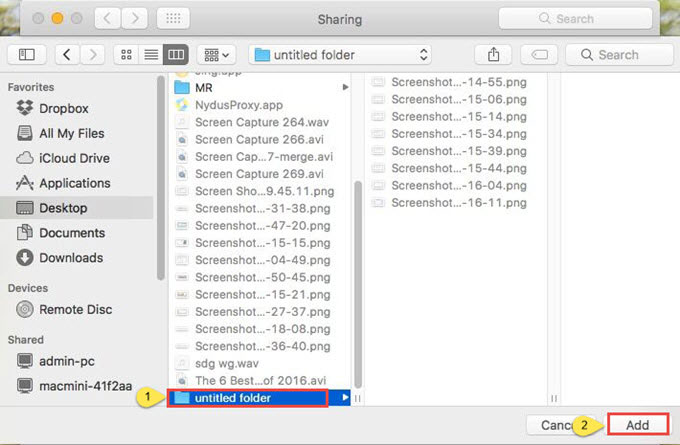
- Select the folder and click “Add”. Then the folder will be added in the “Shared Folders” box.
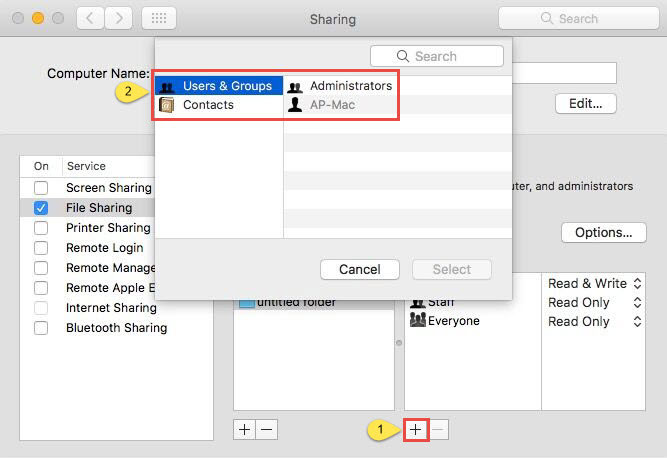
- If you want to add more users to access the shared files, you can click the “+” under “Users” box” and choose from either “Users & Groups” or “Contacts”.
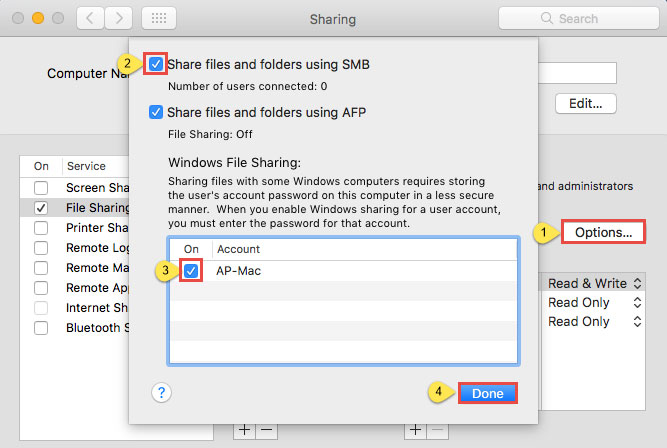
- Tap “Options…”, check “Share files and folders using SMB” and check the box in front of the account name. Tap “Done”.
- At last, you can change the amount of access behind each user’s name. Read & Write means the user can view and copy files from and to this folder. Write Only means the user can only put files into the folder without the permission to see the contents. Read Only represents the opposite, meaning that the user can only view the contents but cannot import files into it. No Access means the user can neither view nor copy the content of the folder.
Note: OS X permits guests to have access to the shared files on your Mac. If you want to turn it off, please go to “System Preferences…” > “Users & Groups” > “Guest User”, and uncheck “Allow guest users to connect to shared folders”.

A Useful App to Access Shared Folder from Phone
After you create the shared folder or hard drive, you can get access to them not only on another computer but also on your phone. With the help of an app called AirMore+, you can freely view or transfer files between mobile phone and PC over local area network.


Leave a Comment